>>

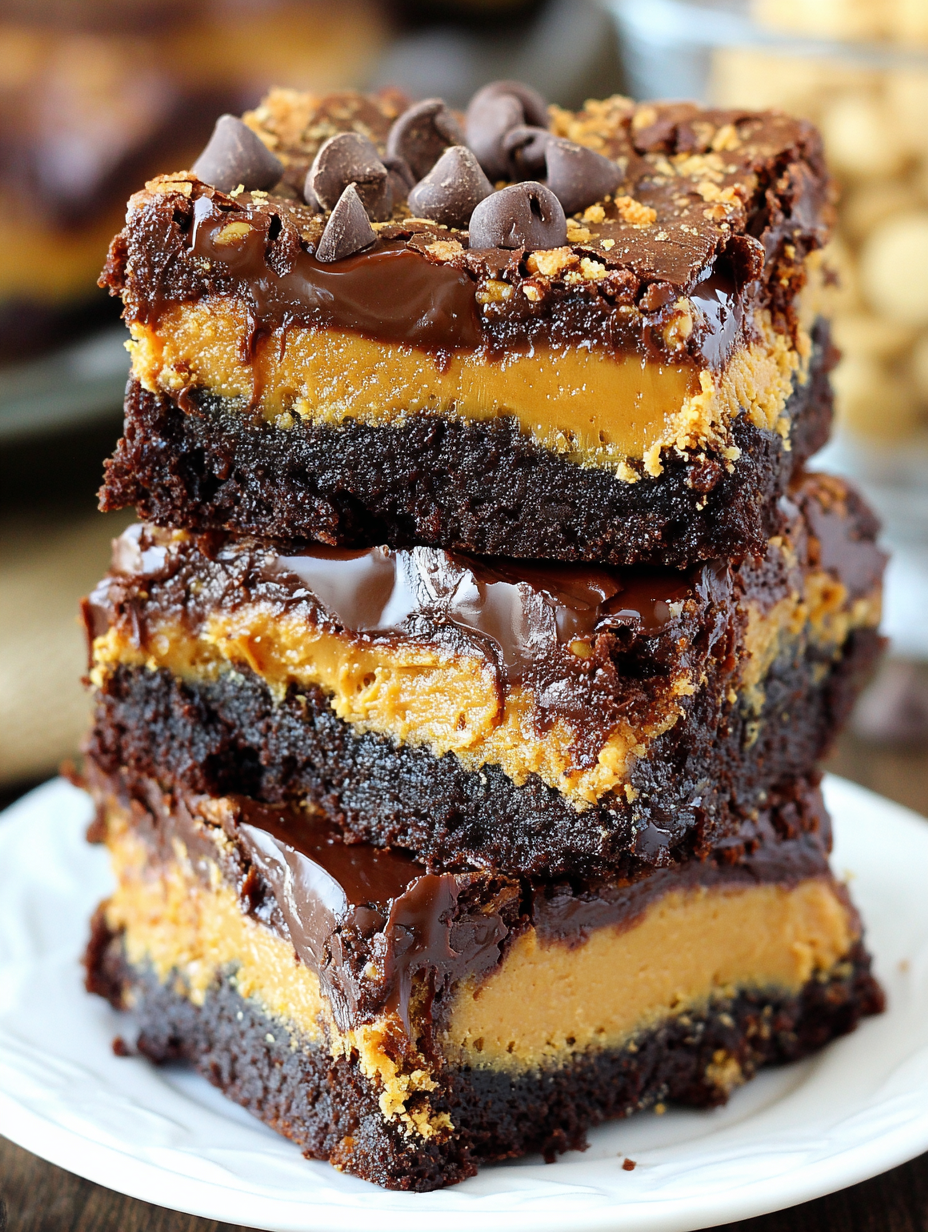
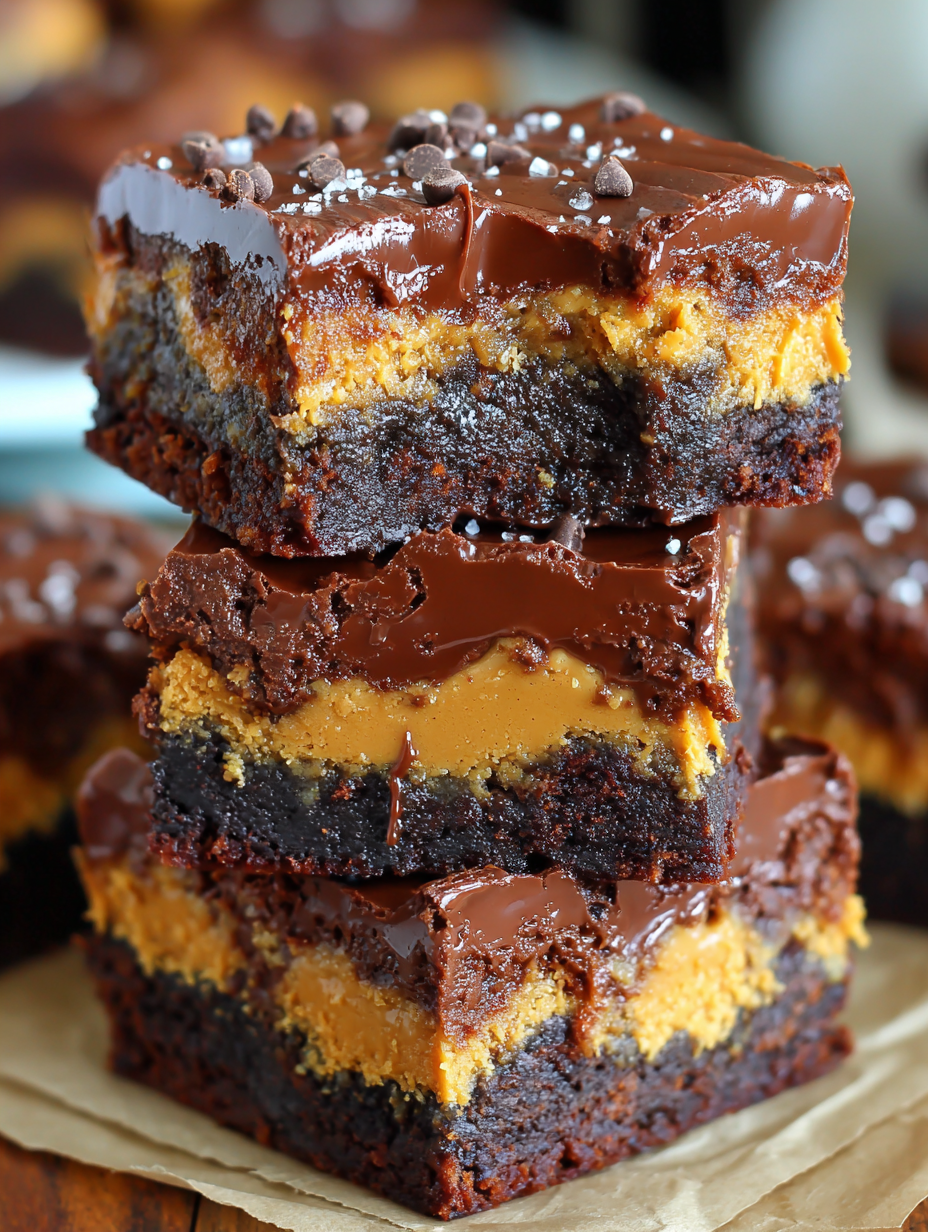
Decadent fudgy flourless brownies layered with a creamy peanut butter filling and finished with a glossy chocolate ganache. Naturally gluten free and impossibly rich.

This peanut butter brownies recipe is one of those treats that immediately becomes a favorite in our house. I first made it on a rainy weekend when I wanted something from scratch with pantry staples and no fuss. The result was so indulgent that everyone kept coming back for one more square. The texture is unbelievably fudgy and chewy while the peanut butter layer adds a silky contrast that makes each bite sing. It is rich but balanced so a small piece feels like a real dessert experience.
I discovered this combination after experimenting with flourless chocolate batters and adding a dollop of peanut butter to test how it would set. The peanut butter filling brings both salt and creaminess and pairs perfectly with bittersweet chocolate. These come together in under an hour and you do not need a mixer which is perfect for busy evenings or when you want showstopping results without a complicated process. My family treats these as a special occasion bar and they always disappear first at parties.
When I first brought these to a family gathering they were the first thing gone. My cousin requested the recipe and I made a batch for a holiday cookie swap. They travel well and hold their shape when cut using the parchment overhang trick. The crowd pleasing factor is real and I love the feedback I get when someone bites into the peanut butter center.
Place the chopped bittersweet chocolate into a heat proof bowl. Heat the heavy cream until it is scalding hot then pour over the chocolate and let sit for five minutes. Stir until glossy and smooth. If small bits remain, microwave on high in 15 second bursts stirring between each burst until fully melted. Pour the ganache over the cooled bars and use an offset spatula to spread into an even layer. Refrigerate until the ganache is set before cutting.
My favorite thing about this dessert is how reliably it pleases a crowd. I have served it at potlucks, birthdays, and simple family dinners. People who say they do not usually like dense chocolate bars always take a second bite. The contrast of the peanut butter layer is the little secret that keeps them reaching back for more.
Store the bars in a single layer in an airtight container in the refrigerator. Use parchment between layers if stacking. At room temperature they soften and the ganache becomes less firm so refrigeration helps keep clean cuts. For longer storage freeze wrapped bars individually then place in a sealed container. Thaw in the refrigerator before serving. To refresh a chilled bar let it sit at room temperature for 10 minutes so the ganache loses some chill and the interior regains a tender bite.
If you need a different nut butter try almond butter but expect a slightly thinner filling and a milder sweet salt balance. Sunflower seed butter works well for a nut free alternative though color and flavor will change. For a dairy free ganache replace the heavy cream with a full fat coconut cream and use dairy free chocolate. Note that texture will vary slightly when using non dairy swaps.
Serve these bars at room temperature with a scoop of vanilla ice cream or a spoonful of whipped cream. Garnish with a dusting of cocoa powder or a few chopped roasted peanuts for crunch. These work well on dessert platters and are substantial enough to pair with coffee after a meal. For a party serve small squares to allow guests to try more than one treat.
The combination of chocolate and peanut butter is an American classic with roots in simple pantry pairings. Chocolate brings richness and depth while peanut butter contributes savory and creamy balance. Layered bars like these draw inspiration from home baked bars and slices that evolved in kitchens where convenience and flavor reigned. The flourless approach echoes older recipes that relied on eggs and chocolate to create dense textures.
In winter add a pinch of ground cinnamon or a teaspoon of espresso powder to the chocolate batter for warmth and depth. For summer make smaller squares and serve with fresh berries to cut the richness. Holiday versions benefit from a sprinkle of flaky sea salt on the ganache for contrast or a swirl of salted caramel on top before the ganache sets.
Make the bars ahead and refrigerate. Ganache stabilizes in the fridge so they are easy to transport. Cut squares just before serving and allow them to warm 10 minutes at room temperature for the best mouthfeel. For portion control cut into smaller bite size pieces and arrange on a platter for gatherings.
These peanut butter bars are a dependable dessert that feels special yet comes together quickly. If you make them once I promise they will show up in your repertoire again and again.
Use room temperature eggs so they incorporate more smoothly and the batter becomes glossy.
Leave a parchment overhang on two sides of the pan to lift the set bars out cleanly for slicing.
Check for doneness by toothpick and remove when a few moist crumbs remain to preserve fudginess.
If ganache separates reheat gently in short bursts and stir until smooth rather than overheating.
Chill the bars before slicing to get cleaner edges and avoid smearing the ganache.
This nourishing peanut butter brownies recipe is sure to be a staple in your kitchen. Enjoy every moist, high protein slice — it is perfect for breakfast or as a wholesome snack any time.
This Peanut Butter Brownies recipe makes perfectly juicy, tender, and flavorful steak every time! Serve with potatoes and a side salad for an unforgettable dinner in under 30 minutes.
Preheat oven to 350 F and lightly spray a 9 in square pan. Line with parchment paper leaving an overhang on two sides for easy removal. Set aside.
In a medium bowl combine peanut butter, sugar, and one room temperature egg. Stir until smooth and glossy then set aside while you prepare the chocolate batter.
Place 12 ounces chocolate chips and cubed butter in a large microwave safe bowl. Heat in 30 second intervals on high stirring between each until smooth and fully melted.
Stir the 3 4 cup sugar and 1 teaspoon vanilla into the warm chocolate mixture until completely combined and glossy.
Add the three eggs one at a time, stirring after each addition until evenly incorporated and the batter turns glossy.
Whisk together the cocoa powder, cornstarch, and salt in a small bowl. Add to the chocolate mixture and stir vigorously until smooth and the batter begins to pull away from the sides of the bowl.
Fold in 1 cup mini semi sweet chocolate chips so they are evenly distributed throughout the batter.
Pour two thirds of the batter into the prepared pan and smooth. Drop small spoonfuls of the peanut butter filling over the batter. Spoon remaining batter on top and smooth lightly.
Bake for 33 to 37 minutes. Start checking at 30 minutes and remove when an inserted toothpick comes out with a few moist crumbs to retain a fudgy texture.
Allow the bars to cool completely on a cooling rack or chill in the refrigerator to speed up setting before pouring ganache.
Place chopped bittersweet chocolate in a heat proof bowl. Heat heavy cream until scalding then pour over the chocolate and let sit five minutes. Stir until smooth and pour over cooled bars.
Refrigerate until ganache is fully set. Use the parchment overhang to lift the bars from the pan and cut into 36 squares. Store in an airtight container in the refrigerator for up to three days.
Last Step: Please leave a rating and comment letting us know how you liked this recipe! This helps our business to thrive and continue providing free, high-quality recipes for you.
Leave a comment & rating below or tag
@feastara on social media!
Buttery oatmeal cookie cups filled with warm, cinnamon-spiced apple pie filling and a sweet glaze for cozy, handheld comfort.
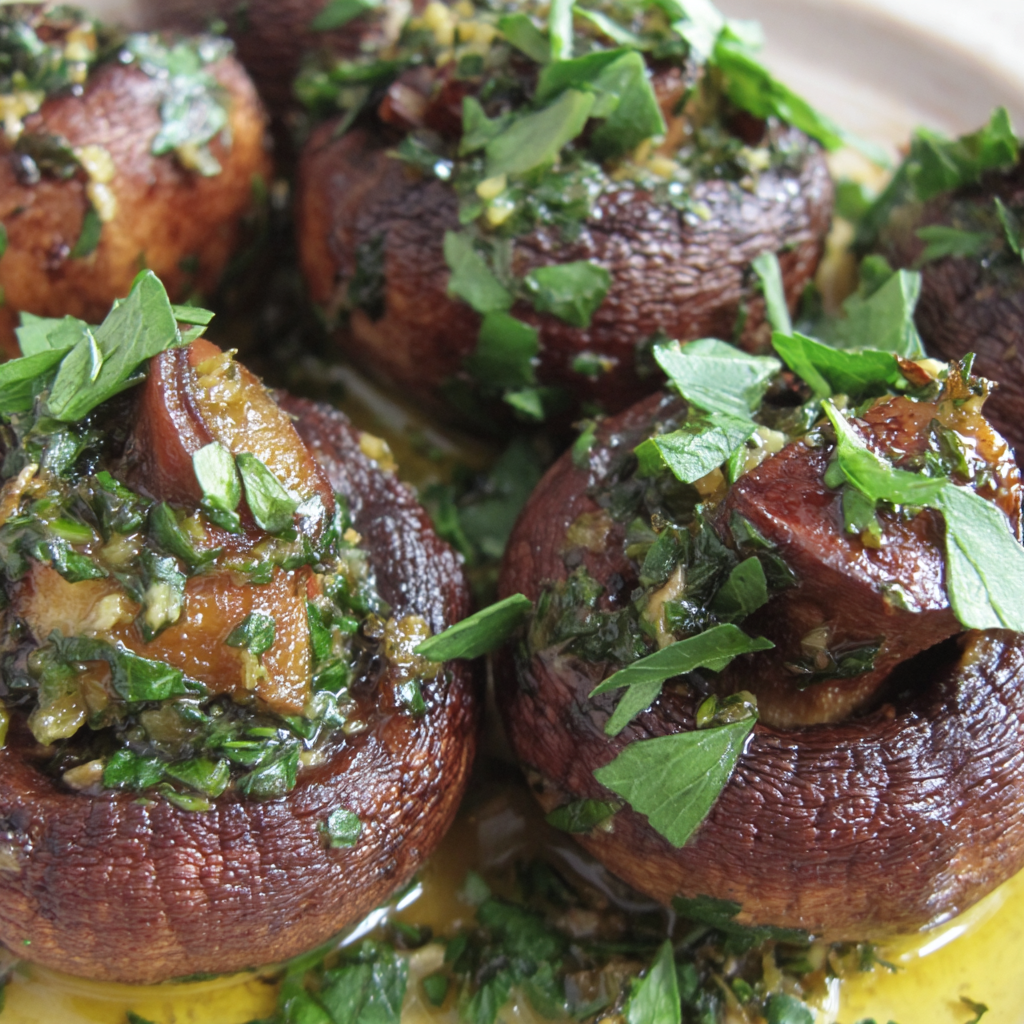
Tender mushroom caps filled with garlicky Provençal herbs, bright lemon, and olive oil. A cozy, elegant AIP-friendly appetizer ready in under an hour.
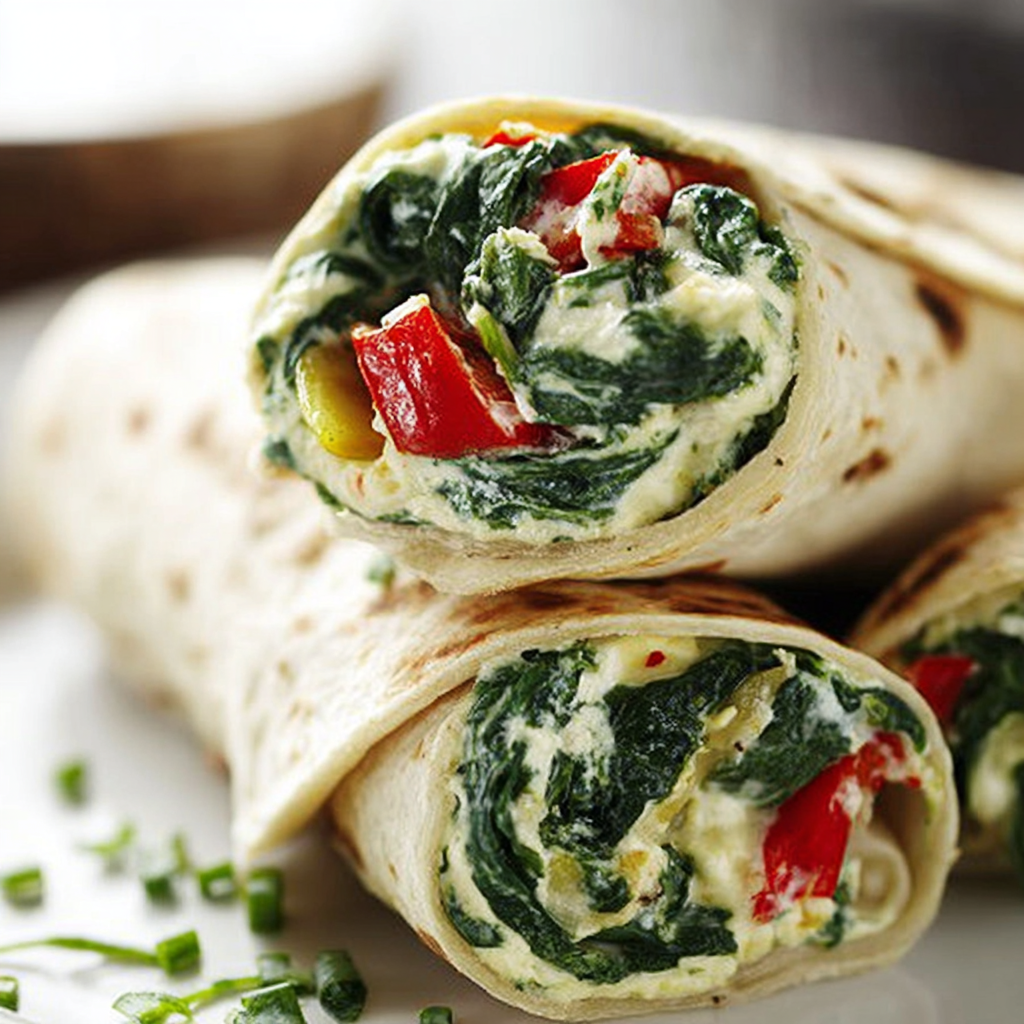
Creamy spinach, peppers, and tangy feta tucked in warm tortillas, baked golden for an easy make-ahead lunch or freezer-friendly snack.
Leave a comment & rating below or tag @feastara on social media!
Enjoyed this recipe? Share it with friends and family, and don't forget to leave a review!
This recipe looks amazing! Can't wait to try it.
Comments are stored locally in your browser. Server comments are displayed alongside your local comments.

Join to receive our email series which contains a round-up of some of our quick and easy family favorite recipes.